Project Ascension
In Development
General
This is a solo project based on PS2 titles: X-Men Legends and Marvel: Ultimate Alliance. You play as four different heroes that use melee combat and elemental abilities. These abilities can be used to fight and to activate interactions in the levels. The player is tasked to fight enemies and solve power puzzles to beat the levels.
Project Info
Genre: Action Adventure
Players: Single Player
Platform: Windows 10 (Controller)
Engine: Unreal Engine 5.1
Development: January 2024- Ongoing
Current Version: Alpha 2.0
Download Project Ascension Demo:
Responsibilities:
Role: Level & Technical Designer
-
Create a design document folder containing gameplay, character, and level design information
-
Create 4 different characters and script all of their abilities
-
Create simple enemies and create a boss in every level
-
Design and script regular and power interactables.
-
Design and blockout at least 3 or 4 levels
Planning
During the planning phase, I created a text document that used to brainstorm mechanics and level ideas. This helped me build the foundation for the project as I used the document's contents and created it in a testing level. When I finished setting up the character's abilities and had enough mechanics I began to design the levels based on the level design document. I made final decisions for themes and areas based on my brainstorming list which were used as the main gameplay. This helped me form the level flow using all of the goals that I had set for the level.


Characters
There are four characters that you can play as which have similar formulas. They each have a 3-hit attack combo and four different power abilities. However, their stats like health & damage differ as well as what they can interact with, leading to different strengths & weaknesses that they can all help each other with.
Parent Character
All 4 of the characters I created are children of BP_ParentCharacter. This character has modular stats like health, functions for power abilities, and interface code that handled both basic and power interactables.
In the actual character blueprints, I can edit the inherited functions with whatever I want to make each ability. Each ability is called by an input action that is mapped with a face button from a controlled (while the power button is being held down).
Click here for more character Information:
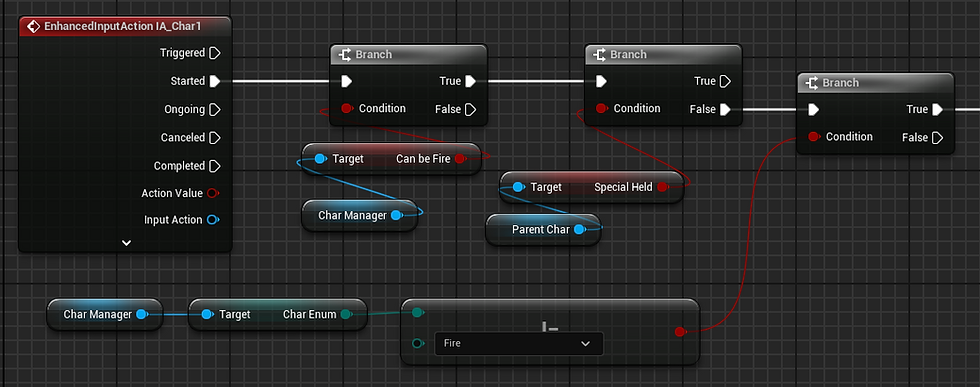
From BP_ParentCharacter:

When the trigger is held, the player gets a widget that shows that the abilities are ready to use.

The special abilities are linked to the controller's face buttons and will be activated if the right trigger is held.
When the trigger is held, the player gets a widget that shows that the abilities are ready to use.
Level Scripting
There are four characters that you can play as which have similar formulas. They each have a 3-hit attack combo and four different power abilities. However, their stats like health & damage differ as well as what they can interact with, leading to different strengths & weaknesses that they can all help each other with.
Character Manager
The Character Manager in an empty actor that each level has. It has four Booleans that are instance editable and allow me to choose which characters can be swapped too. I can later change it if needed by refrencing it in other bluprints or events in the level.
The manager is also used to tell other blueprints which character is currently selected. It does this with an event that is triggered in the level blueprint whenever a button on the directional pad is pressed.

This manager changes an Enum depending on what character is selected from the level blueprint to let others know who is being played.
When a swap button is pressed, it checks to see if the character is swappable, if the special button is not being held, then if you are not already that character.

The final thing the code runs is a possession of the selected character then calls an event dedicated to the character that was chosen.
This manager changes an Enum depending on what character is selected from the level blueprint to let others know who is being played.
Battle Manager
The Character Manager in an empty actor that can be placed anywhere in the level preferably in a battle zone. There is an instance editable array of enemies that can be increased to the amount of enemies wanted, then be selected in the editor.
In the blueprint, it sets an integer to the amount of enemies chosen and a kill count is increased until it matches the total enemies. When that happens, an event dispatcher is called for anything that needs to happen after a fight is over.

The battle manager allows me to add as many enemies as I want and will end when all the enemies are defeated. An event then gets triggered and can be bound to a number of blueprints that I have.

The battle manager lets me create an array of enemies that can then be selected onto the viewport.
The battle manager allows me to add as many enemies as I want and will end when all the enemies are defeated. An event then gets triggered and can be bound to a number of blueprints that I have.
Power Interactables
The Power Interactables are one of the key components that make up the gameplay. These allow the player to use the different abilities that all the characters have to offer and have a diverse set of interactable experiences with the levels.
All of the interactables start with an interface which is then used in an a parent power interactable actor. I can then create a child blueprint that has those interfaces and add whatever I need to when it is interacted with an ability.
This made it a lot easier for me to design engaging gameplay by utilizing the different abilities that the characters have and fitting them into their themes and roles.

The parent interactable has many interfaces for each of the abilities. I can make a child blueprint and add the code for the interaction.

This is the Ice bridge that I made as an example. The bridge is created with the Ice Blast ability only.
The parent interactable has many interfaces for each of the abilities. I can make a child blueprint and add the code for the interaction.
Feedback
Character Widget
The Character Widget not only gives the player information on health and energy, but also shows a 'd-pad' shape that corresponds with a character. Their symbols get colored when a character is selected to give the player feedback on who they currently are.
Level 1 - Downtown
This is the first level of the project, it takes place in a city based on Bellevue WA. Here the player is taught the basics controls and mechanics of the game including: movement, combat, powers, and interactables. All four characters share a similar formula so this insures that they can get ready for when they have to play any of them.

Inspiration
I wanted an urban setting for the first level so I decided to go with Bellevue Washington because its a city that I live close to. I gathered images of the area surrounding the mall so that I can create a level around it.

Full Playthrough
Drafts
Draft Gallery:


Key:

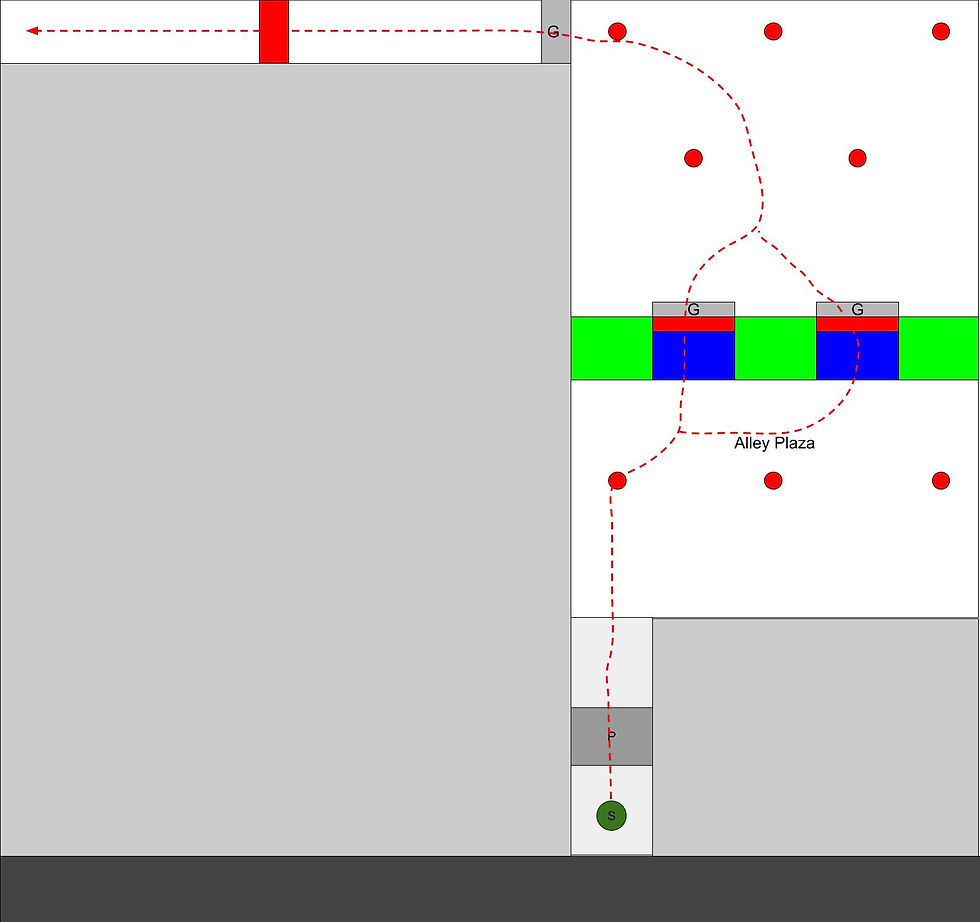
Level Guidance
Breadcrumbs
I used breadcrumbing by placing down the money collectables to incite the player to collect and follow. These helped me ensure that the player will follow any particular path that I needed as well as to nudge them to any interaction I wanted to show them.
Leading lines
I utilizes some of the many props that the city had as well as its natural straight lines to point towards the next area. Its more evident in parts that have a larger play area.

Cutscenes
To ensure that the player knows exactly where to go next, I implemented a cutscene script that allowed me to visually show the player the next goal. These can trigger via a collider or can be called after any event is complete.


Button Prompts
I created a collider that displays text and buttons and is customizable from the editor. I can choose to display: pure text, text with one button, and text with two buttons which is needed for the special abilities. All this served its purpose of showing the player the controls.


Blockout
I was able to blockout and prototype my levels using the basic shapes provided by 'SuperGrid'. I started with basic shapes to get the main area set up then create a more detailed blockout that fits with the inspiration. I created entire static meshes with some of the structures to end up with modular pieces that could be used to fill up spaces in the city. I also create smaller meshes that can be used for gameplay or for detailing the area ranging from street lamps, trees, and doors.

Level 2 - Park Tunnels
This is the second level of the project, it starts off in a park located in a city center and transitions into a sewer tunnel system. Here the Ice Character shines as there are many water related interactive puzzles but swapping to the Fire Character is important as he also needs to help. Ability interactions are more important here compared to the more combat heavy level 1.

Level Boss: Rogelio Aguas
Rogelio is a multi-phase water monster and is the final boss of this level.
Click here for more character Information:

Inspiration
Since I based the first level off of Bellevue, WA I decided to use "Downtown Park" located in that same city. I also decided to use a sewer because it makes way for water related puzzles that the Ice Character can use, and because many PS2 era games had sewer levels making a good little throwback.

Full Playthrough
Level Guidance
Breadcrumbs
Just like level 1, I used the money as breadcrumbs to nudge the player towards the right direction as well as other areas to explore.


T - Junctions and pipes
Since the sewer portion is mainly tunnels, I used T-shaped junctions with a clear dead end to limit confusion. I also used pipes to lead the player towards the next area as well.


All characters say different things if they interact with the final door, and if Joule is already rescued a new dialogue will appear.
Dialogue
I improved the dialogue system after completing level 1 and I was able to guide the player using the conversations and thoughts of the characters. This also highlights each character's personality especially since different ones appear if another character is being played.
Cutscenes
Using cinematics with some being paired with dialogue ensured that the player knew exactly where their next destination is.

This cutscene introduces the level's setting and reveals the final goal.

Shows the deactivation of the fire pipe, making it safe for Matt to cross.

Reveals 2 paths for the player to take, one for each character.
This cutscene introduces the level's setting and reveals the final goal.
Leading Lines
I used this technique to drive the player's attention towards the "Power Tower" which is the goal. For the sewers, I used the natural lines from the tunnel edges as well as any platforms or catwalks.


Character Passives
Each character has their strengths and weaknesses so I ensured that they were familiar with this concept using the environment.

Matt is weak to fire and will be blocked and damaged if he tries to go through it. Ignacio is immune.

Matt is immune to slipping on ice. This section is a great way of teaching this because they are forced to use both characters and move around, feeling the diffrence.

Ignacio is weak to high flowing water and will get blocked and damaged if he gets close. Matt is immune.
Matt is weak to fire and will be blocked and damaged if he tries to go through it. Ignacio is immune.
Blockout
This level was mainly underground tunnels so I did not need that many meshes, most of the ones I created were for the park.